45 Days And 8 Coats Later....
KathyD Has A New PaintJob!
Monday, February 14, 2011
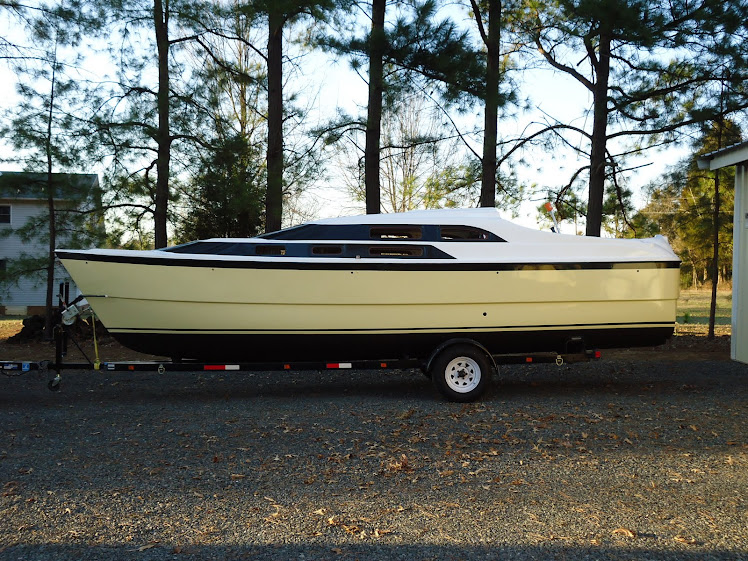
The "Final" Coats Of Paint Are On!
Short update today. The painting has been completed.......well almost completed. I guess with every big paint job like this some touch up work will be necessary. Although the photos that I posted below do not show the flaws, they are there. The topside striping was the hardest to tape with the curves and there was some seeping of the paint under the tape where it was not absolutley sealed down to the hull. Masking tape does not turn very easily and you end up getting wrinkles at the turn points. The bleed through isn't horrible, however once the paint hardens we will retape the boat and touch up the white. The paint job as a whole took about 45 days and 8 coats of paint. 2 coats of primer, 3 coats of Fighting Lady Yellow and 3 coats of Jade Mist Green/Black. Yes that is green, sort of. I took one quart of Interlux Perfection Jade Mist Green and mixed one ounce of Interlux Perfection Jet Black to tone it down some. The green by itself was as loud as some of those little old ladies that wear so much perfume it arrives 5 minutes before they do. We painted one coat of the first green/black mixture and it looked like Kermit the Frog. For the next two coats we ended up with a total of 4 ounces of black to 20 ounces of green. Wallah, Super Dark Green! The green does come through slightly in the sun, and matches very well with the Fighting Lady Yellow. This was quite a project. The material estimations by the vendors web sites were half of what you really needed to get the project completed. Be aware of this fact. I went into this project expecting that. Our first puchase of materials, based upon what the Distributors websites provided as an estimation, came to $500.00. By the time the project wrapped up we ended up spending $1250.00. We are very pleased with the results and look forward to painting the interior next.
Wednesday, February 2, 2011
Fighting Lady Yellow
The KathyD is is well on its way to a new paint job. The Interlux Perfection Two Part Epoxy is a great product and the results look great. The old rule of thumb applies here, "Painting is 80% preperation and 20% painting". The topside decks were done in Perfection Snow White and the Hull was done in Perfection Fighting Lady Yellow. We started the painting project on New Years Eve and it's now the 2nd of February and we still have the striping to do. The boat had already had its initial sanding prior to New Years Eve so we went right into the primimg. We put two coats of Interlux Two Part Epoxy Primecoat over the hull and topsides. Between each coat it was sanded with 220 sandpaper, blown off with an air compressor and wiped down with Interlux Thinner 2333N. The primer dried quicker than the paint did so we were able to complete the priming in three days. The painting took the remaining time. After the primimg, we went back and fixed some areas that needed attention and then wiped the hull down and began the painting. We concentrated on the topside first, rolling and tipping as we went. The progress was slow, it took about 4 hours to paint the snowwhite on the topside. We allowed the paint to harden for two days before we even thought about putting a piece of sandpaper on it. At this stage I found it better to hand sand between coats rather than use an orbital tool. I ended up taking the sheet of 400 sandpaper, cutting it in half and wrapping it around one of those 3M Sponge sanding blocks and went to town sanding. The next couple days were spent close to an Advil bottle. The same procedure was used to apply the Fighting Lady Yellow on the hull. I ended up putting 4 coats of paint and two coats of primer on both topside and the hull. Every coat we put on was light, so the fourth coat really made the difference. I highly recommend applying Perfection in light coats. Also, do not thin it if rolling and tipping unless your going for the runny look. Running is not as much a problem as sagging was. Applying the paint in light coats and retipping it was the key. Always look back over your work to be sure sags are not forming. All of the hull pieces that were removed for this project, the rudders, console, hatchs etc were also primed and painted at the same time. In terms of materials, we used 1 1/2 gallons of Primer, 1 1/2 gallons of Snowwhite and 1 gallon of Fighting Lady Yellow. We will put a coat of bottom paint on right before we launch, but looking at the project list, that might not be until fall! We are scheduled to do the topside, hull and boot stripes this weekend. We will update the blog with the results!
Wednesday, October 20, 2010
A Little Background Catch Up
When we started out back in the first week of September, we had only intended to get the water out of the bilge. What actually happened though was a different story. Starting early on a Saturday morning, we took everything out of the cabin, packed it away inside the shop and then removed all of the sails and canvas. It took the first weekend to get everything unloaded, hull washed, motor flushed, rails and lifelines off and get her backed in the shop. You never really know how much gear you really have until you take all of it off the boat and try to store it properly. We were careful with the gear, taking time to wash all the sails, cushions and canvas and packing all of the cabin/galley gear in to Rubbermaid storage bins. This also allowed us an opportunity to trash all of the stuff we never really needed. Since we will be adding weight during this refit, dropping what we do not need will offset that somewhat.
The mast, which had been completely reworked back in June, was stored outside although it will be coming into the shop later in the refit to install some new antenna wire for a Garmin Marine Network device.
Once safely tucked away inside the shop the teardown began. The hatches, anchor locker door and cockpit and stern seats were taken off. All of the deck hardware, cleats, winches, Bimini connectors, slide rails, hinges etc. etc. were removed. We didn’t try to mark all of the screws as they came out; instead we opted to put them in one Rubbermaid container. They will be cleaned and reorganized back into our normal stainless hardware storage bins. When the rebuild begins we will pull from there and then use it as our hardware box after the refit. We plan on one afternoon to sit at an 8 foot table and pour out all of the hardware to clean and organize it. All of the hardware, screws, washers, nuts, bolts etc. fill two 12 qt. Rubbermaid bins and weigh 34 pounds!
The motor and steering systems were removed, as well as the steering pedestal. We were careful to take pictures of everything prior to removal. We used an engine life to remove the motor and built an extension onto our workbench to store both it and the dinghy motor. There were no major difficulties tearing it all down, however it is definitely a two person job. We kept the boat and work areas as clean as possible during this time. Taking the time upfront to properly clean and store all of the hardware and gear is going to simplify the rebuild also. As you can see in the photos, the entire interior has been stripped. We plan on installing a new fresh water system and perform some electrical upgrades as well. A new galley will be built and the head will be upgraded as well. The forward berth is going to be modified to provide a better sleeping area and additional enclosed storage areas will also be built. I can see that much of this project will be “making it up as you go”. So here we go. Our boat is totally trashed and it is time to start the rebuild/pimping.
Friday, October 15, 2010
Starting the Blog Today
As indicated above, this blog is dedicated to the overhaul/refit/pimping of a Macgregor 26M sailboat named "KathyD". We are getting everything together over the next day or so to get this blog going and keep it current. The boat overhaul is actually well underway, having begun in early September. The boat is currently stripped down and undergoing hull sanding outside. This is a complete tear down, deck hardware off, engine removed, interior removed, steering system upgraded, water system and mast upgrades as well. We will start the blog by stepping back to the beginning and give as much detail as possible along with photos in order to makes this useful to others who may be interested in performing a similar project. We have been very diligently photographing the project so we can share them with the blog, as well as refer back to when we are absolutely clueless how something goes back together. The overhaul is being performed in our shop in Stanfield, NC. Over the next week or so I hope to catch the blog up to the point we currently are in the project. We will also be using Picasa and YouTube during this overhaul. We will try to keep it simple, but some posts may sound like I am babbling incoherently. Either way we hope to provide some useful information on overhauling/refitting/pimping out a Macgregor 26.
Subscribe to:
Posts (Atom)